Add Google reCAPTCHAv3 to WordPress comments without plugin

Some times ago, I did an article on this topic but regarding Google’s reCAPTCHAv2 you can check it here.
I had a few request to do it for reCAPTCHAv3, so here we go.
The main difference between v2 and v3, it’s that v3 doesn’t interrupt users and it runs adaptive risk analysis in order to make the difference between robots and humans.
Finally v3 will return a score from 0 to 1 (most secure) and you can choose the most appropriate for your website.

Tested on WordPress 5.9 with Twenty Seventeen theme

First step would be to register your site on Google

Register Google reCaptcha version 3

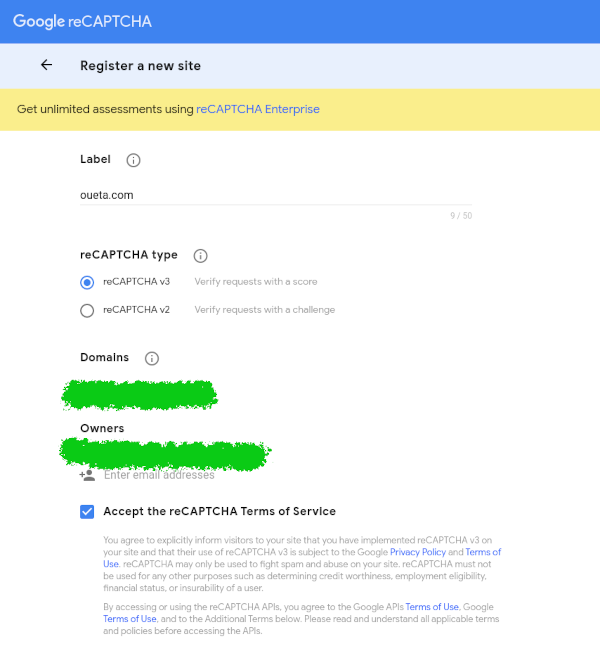
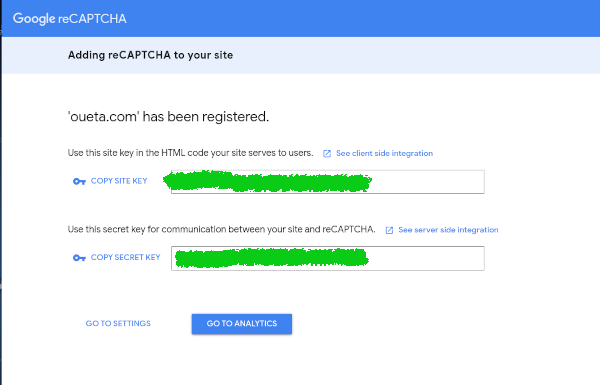
Once you registered, Google will provide you a site and secret key. We will use the site key in our front end code, while the secret will be used in the backend code.

Google recaptcha site and secret key

Edit single.php from your theme folder (in my example /wp-content/themes/twentyseventeen) and add the following code before get_header(); and of course replace YOUR_SITE_KEY_HERE with your site key.

wp_enqueue_script('google-recaptcha', 'https://www.google.com/recaptcha/api.js?render=YOUR_SITE_KEY_HERE');

Edit functions.php from your theme folder (in my example /wp-content/themes/twentyseventeen) and add the following code and replace YOUR_SITE_KEY_HERE (line 15) and YOUR_SECRET_KEY_HERE (line 34)

/**
 * Google recaptcha add before the submit button
 */

function add_google_recaptcha($submit_field) {
    $submit_field['submit_field'] = '<input type="hidden" id="g-recaptcha-response" name="g-recaptcha-response">
                                     <input type="hidden" name="action" value="validate_captcha"> 
                                     <input name="buttonSubmit" type="submit" id="buttonSubmit" class="submit" value="Post Comment" /> 
                                     <input type="hidden" name="comment_post_ID" value="'. get_the_id() . '" id="comment_post_ID" />
                                     <input type="hidden" name="comment_parent" id="comment_parent" value="0" />
                                     <script>
                                     document.getElementById("buttonSubmit").onclick = function onClick(e) {
                                        e.preventDefault();
                                        grecaptcha.ready(function() {
                                          grecaptcha.execute("YOUR_SITE_KEY_HERE", {action: "submit"}).then(function(token) {
                                            document.getElementById("g-recaptcha-response").value = token;
                                            document.getElementById("commentform").submit();
                                          });
                                        });
                                    }
                                    </script>';
    return $submit_field;
}
if (!is_user_logged_in()) {
	add_filter('comment_form_defaults','add_google_recaptcha');
}

/**
 * Google recaptcha check, validate and catch the spammer
 */

function is_valid_captcha($captcha) {
$captcha_postdata = http_build_query(array(
                            'secret' => 'YOUR_SECRET_KEY_HERE',
                            'response' => $captcha,
                            'remoteip' => $_SERVER['REMOTE_ADDR']));
$captcha_opts = array('http' => array(
                      'method'  => 'POST',
                      'header'  => 'Content-type: application/x-www-form-urlencoded',
                      'content' => $captcha_postdata));
$captcha_context  = stream_context_create($captcha_opts);
$captcha_response = json_decode(file_get_contents("https://www.google.com/recaptcha/api/siteverify" , false , $captcha_context), true);
    if ($captcha_response['success'] && $captcha_response['score'] > 0.5)
        return true;
    else
        return false;
}


function verify_google_recaptcha() {
$recaptcha = $_POST['g-recaptcha-response'];
if (empty($recaptcha))
    wp_die( __("<b>ERROR:</b><b>Sorry, spam detected</b>"));
else if (!is_valid_captcha($recaptcha))
    wp_die( __("<b>Sorry, spam detected!</b>"));
}

The users score needs to be bigger than 0.5 in order to be able to post comments, you can modify it on line 43. Google provides also a nice dashboard where you can check your users behavior.

Google Drive on Linux with rclone

Rclone logo

Probably you are waiting for the official Google Drive client for Linux as me, but unfortunately the time that this article is written, we don’t have one. There are a few other piece of softwares that can do the job also GNOME supports it, but for my personal taste rclone works fine!

I use Debian 11 at this point, but most probably should work on any distro, let’s install it!

Install

apt-get install rclone

Setup credentials with Google API, it works without but during my tests it was much slower.

Create the OAuth 2.0 Client IDs on Google Cloud Console

Step 1

Google API add credentials

Step 2

Google API add credentials add

Step 3

Google API add credentials add name

Step 4, Client ID and Secret will be used while configuring the rclone

Rclone configuration, follow the wizard.

rclone config
No remotes found - make a new one
n) New remote
s) Set configuration password
q) Quit config
n/s/q> n
name> My_GoogleDrive
Type of storage to configure.
Enter a string value. Press Enter for the default ("").
Choose a number from below, or type in your own value
...
11 / FTP Connection
   \ "ftp"
12 / Google Cloud Storage (this is not Google Drive)
   \ "google cloud storage"
13 / Google Drive
   \ "drive"
14 / Google Photos
   \ "google photos"
...
Storage> 13
** See help for drive backend at: https://rclone.org/drive/ **
Google Application Client Id
Setting your own is recommended.
See https://rclone.org/drive/#making-your-own-client-id for how to create your own.
If you leave this blank, it will use an internal key which is low performance.
Enter a string value. Press Enter for the default ("").
client_id> Type your Client ID here!
OAuth Client Secret
Leave blank normally.
Enter a string value. Press Enter for the default ("").
client_secret> Type your Client Secret here!
Scope that rclone should use when requesting access from drive.
Enter a string value. Press Enter for the default ("").
Choose a number from below, or type in your own value
 1 / Full access all files, excluding Application Data Folder.
   \ "drive"
 2 / Read-only access to file metadata and file contents.
   \ "drive.readonly"
   / Access to files created by rclone only.
 3 | These are visible in the drive website.
   | File authorization is revoked when the user deauthorizes the app.
   \ "drive.file"
   / Allows read and write access to the Application Data folder.
 4 | This is not visible in the drive website.
   \ "drive.appfolder"
   / Allows read-only access to file metadata but
 5 | does not allow any access to read or download file content.
   \ "drive.metadata.readonly"
scope> 1
ID of the root folder
Leave blank normally.

In the next section, I usually use the default options (press Enter) but you can customize it for your needs.

Fill in to access "Computers" folders (see docs), or for rclone to use
a non root folder as its starting point.

Enter a string value. Press Enter for the default ("").
root_folder_id> 
Service Account Credentials JSON file path 
Leave blank normally.
Needed only if you want use SA instead of interactive login.

Leading `~` will be expanded in the file name as will environment variables such as `${RCLONE_CONFIG_DIR}`.

Enter a string value. Press Enter for the default ("").
service_account_file> 
Edit advanced config? (y/n)
y) Yes
n) No (default)
y/n> 
Remote config
Use auto config?
 * Say Y if not sure
 * Say N if you are working on a remote or headless machine
y) Yes (default)
n) No
y/n> 
If your browser doesn't open automatically go to the following link: http://127.0.0.1:53682/auth?state=2YFW_P5Kf1TC4YD3I1jMCg
Log in and authorize rclone for access
Waiting for code...

At this point your browser should open to ask access for the rclone app.

Allow rclone to your Google Account

Once you accepted the configuration is almost done.

Got code
Configure this as a team drive?
y) Yes
n) No (default)
y/n>

Rclone successfully installed

We are almost done, let’s setup the systemd service and start it!

sudo vim /lib/systemd/system/rclone.service
[Unit]
Description=Rclone
Requires=network-online.target
After=network-online.target
 
[Service]
User=your_user_here
Type=oneshot
RemainAfterExit=yes
ExecStart=/usr/bin/rclone mount My_GoogleDrive: ${HOME}/GoogleDrive --vfs-cache-mode full --daemon --config ${HOME}/.config/rclone/rclone.conf
ExecStop=/usr/bin/fusermount -u ${HOME}/GoogleDrive -z
ExecStartPre=/bin/sh -c 'until ping -c1 google.com > /dev/null; do sleep 1; done;'

[Install]
WantedBy=multi-user.target
EOF
sudo systemctl daemon-reload
sudo systemctl enable rclone
sudo systemctl start rclone